QuickEye Main Page
/
Help Topic List /
Item Creator
QuickEye Estimator Help Topic:
Print Dialog
 Dialog purpose:
Quick Tips:
Dialog purpose:
Quick Tips:
- Select or review, selected printer and paper size.
- Print full sheet, fit to page (rotated if needed, and as large as
will fit).
- Print 100% (of image size), trimming if needed.
- Print half scale or another specific scale.
- Print view to page (whatever is showing in the zoomed view as large
as it can).
- Select multiple sheets to print, fit or to a specific scale.
- Select a range of sheets, Click on first then Shift-Click on last.
Detailed Instructions:
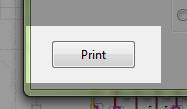
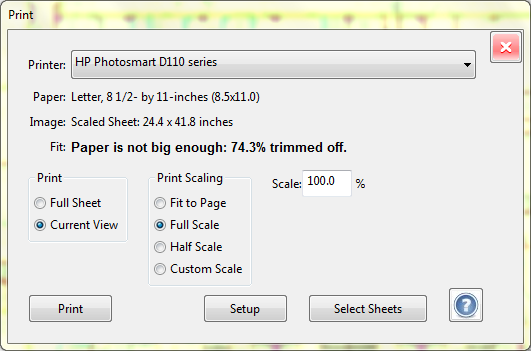
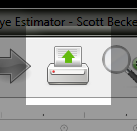
Open the Print dialog by pressing the print icon in the main toolbar.
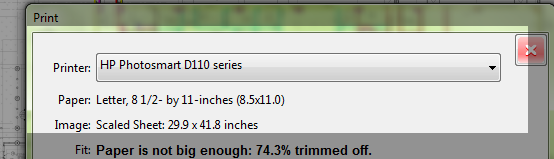
At the top of the dialog, you will see the current printer and the
current paper size. To choose a different printer, click on the printer
name and select it from the pulldown menu.
To change the paper size, press the Setup button at the bottom.

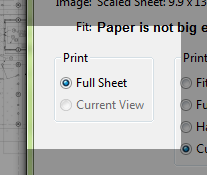
The Print selection allows you to choose between printing the Full Sheet
and the Current View. If the drawing sheet, in the main window, is
zoomed all the way out, so that the entire sheet is the currently in
view, then the Full Sheet choice will be selected and Current View
choice will be disabled, since they have the exact same effect.
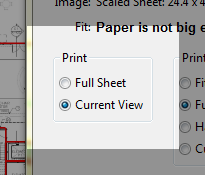
If, however, the drawing in the main window is zoomed in on a detail,
the Print selection will default to Current View. If you leave this
selected when you print, the portion of the image which is shown will be
printed on the page as large as it can. This allows you to print usable
scale details, even if you do not have a large format printer.
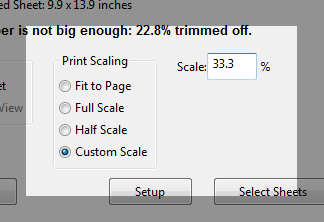
Next is the Print Scaling selection. The top choice, "Fit to Page", will
print the included image (selected above) as large as it can on the
paper.
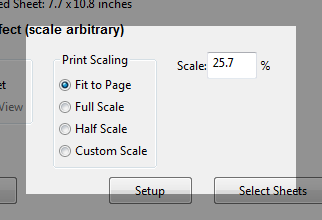
To the right is the Scale field. This will be updated to indicate the
scale of the printed drawing relative to the size of the image. Whenever
"Fit to Page" is selected, the printed scale will be arbitrary. If the
drawing sheet is C size and the paper is C size (24x36), the printed
output will be close to full scale but almost never exactly 100%. This is due
to variations in scanning margins and unprintable margins etc. If you
want, exact scalable prints, then select Full Scale (100%), Half Scale
(50%) or Custom Scale as required.
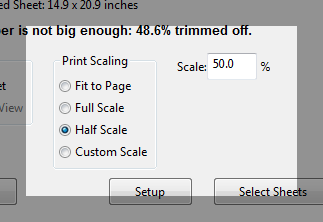
The chosen and indicated scale is relative to the size of the image.
This means that if the image is of a half scale drawing than 100% means
you will get a half scale drawing. If the drawing was off by 2 and a
quarter inches, then at 50% it means you will get a half scale drawing
that is off by 1 and an eight. You get the idea. By the way, if the
image is of a half scale drawing and you want full scale, enter 200%.
The quality won't be as good as it could be but it will be a full scale
drawing (or real close).
Right underneath the Printer and Page size is "Image" and "Fit".
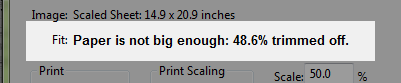
Image indicates the size of the included image, after it has been
scaled, the "Scaled Sheet" size. Fit is an advisor, which
tells you in plain english, how well the selected Page size matches the
Scaled Sheet size. It will indicate the degree to which the image can't
fully be printed because the Paper size is smaller than the Scaled Sheet
size or the amount that the Paper size exceeds what is needed. If the
fit is not very good, you have two choices to correct it. You can adjust
the Print Scaling selection or you can select a different Page size with
the Setup button.
By the way, the Setup dialog can't be documented very well here, because it
is provided by your print driver and is different for every printer. But
it will always allow you to select page sizes which are valid for your
model of printer as well as let you select print quality and other
settings. These settings are remembered the next time you print, to save
you time. Also the Portrait/Landscape setting does not matter because
QuickEye will always select the one which fits the Scaled
Sheet to the Paper the largest, with the least amount trimmed off.
When you are satisfied with the print settings, press the Print button
to proceed.
In order to print multiple sheets, press the "Select Sheets" button
located on the bottom right of the Print dialog. First, select the
sheets you need to print. If they are all in a row, click on the first
one, and then hold down the "Shift" key and click on last one. This
will select the entire range of sheets quickly. You may use "Ctrl" +
click (hold the control key and then click) to select or un-select
individual sheets.

The Scale field at the bottom is a reflection of the Scale field on the
first Print dialog, except that it is blank to indicate "Fit to Page".
You may adjust or blank it as needed for your prints.
When you've selected the sheets you need printed, press the Print button
to proceed.